

Cake Stand – Part 2
Part 1 of this project deals with the top section of the cake stand. This part gives the procedure for making the base, attaching the base to the top section, and bringing the project to completion.
Make the Base
You should have four roughed- 3” and 2.5”. All are assumed to be 3/4” thick. The first objective is to glue
these together to form a stack of four disks, like a wedding cake. It is done on
the lathe using the tailstock to apply the clamping pressure.
3” and 2.5”. All are assumed to be 3/4” thick. The first objective is to glue
these together to form a stack of four disks, like a wedding cake. It is done on
the lathe using the tailstock to apply the clamping pressure.

You can get a head start by jamming the disks against a flat surface and truing the rim.
1. Jam the 6” disk agains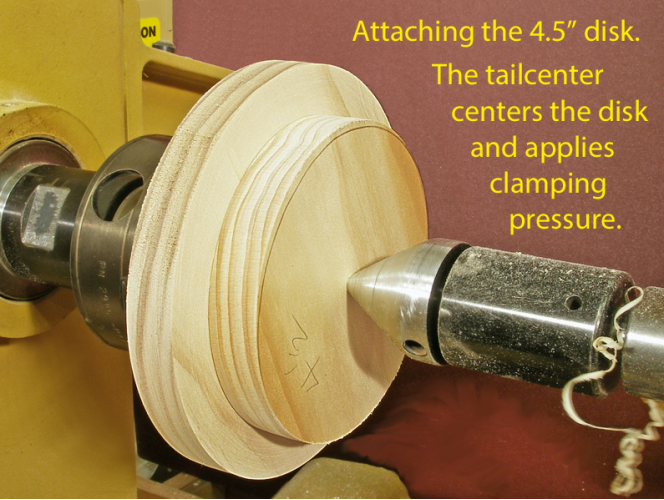 t a flat plate. Form an inset tenon suitable for your chuck
about 2” in diameter.
t a flat plate. Form an inset tenon suitable for your chuck
about 2” in diameter.
2 . Mount the disk in a chuck. Clean up the exposed face and flatten with a sanding
block.
. Mount the disk in a chuck. Clean up the exposed face and flatten with a sanding
block.
3. If necessary, flatten one face of the 4.5” disk by stroking it across a sheet
of sandpaper taped to a flat surface. Then attach it to the 6” disk that is still
on the lathe. Use the tailstock to center the disk and apply clamping pressure.
4. After the glue sets up, flatten the exposed face of the 4.5” disk with a sanding block.
5. Now repeat steps 3 and 4 above f or the 3” disk. That is, flatten the disk, attach
it to the 4.5” disk, true it up, and flatten the exposed face.
or the 3” disk. That is, flatten the disk, attach
it to the 4.5” disk, true it up, and flatten the exposed face.
6. Once again do a repeat of steps 3 and 4, this time for the 2.5” disk. This time, however, there is no reason to flatten the exposed face.
An alternative approach to the six steps above would be to glue the stack of disks together all at one time. I have not tried this because of the imagined difficulties associated with clamping the stack and having one or more disks slide sideways as clamping pressure is applied. The method described above may take longer but the likelihood of running into alignment problems is virtually nil.
7. We will eventually need to reverse the stack in order to hollow out the bottom,
shape the foot, and  so forth. So, form a tenon on the corner of the 2.5” disk, but
keep this tenon fairly narrow, somewhat less than 1/4” (7/32” is good.).
so forth. So, form a tenon on the corner of the 2.5” disk, but
keep this tenon fairly narrow, somewhat less than 1/4” (7/32” is good.).
8. At this point you can begin shaping the profile but don’t ta ke it to its final
form. Because there is now a tenon on each end of the piece, you can reverse it in
the chuck as you wish if you prefer one orientation over the other while shaping
the profile.
ke it to its final
form. Because there is now a tenon on each end of the piece, you can reverse it in
the chuck as you wish if you prefer one orientation over the other while shaping
the profile.
9. After the profile is pretty well established, mount the piece with the jaws of the chuck gripping the tenon on the 2.5” disk. Bring up the tailstock to provide support. Turn the edge of the 6” disk to its final form including the angle and the slope on what will become the top of the base.
10. With the tailstock still in place to provide support, begin hollowing the bottom. Leave a foot that is at least 5/8” wide. Work as closely to the tailstock as you can before pulling it back out of the way to complete the hollowing. Hollow to a depth of about an inch or slightly more. Sand the hollow and the foot.


11. Once the hollowing is done, bring the tailstock back up and use the point of
the cone center to mark the center at the bottom of the hollow. This step is very
important; don’t forget it. Remove the piece from the lathe.
point of
the cone center to mark the center at the bottom of the hollow. This step is very
important; don’t forget it. Remove the piece from the lathe.
12. Reverse the stack: jam chuck the piece against a flat surface, or if you prefer,
you can turn a more elaborate jam chuck customized for the base of the stack. Modify
the tenon on the 2.5” disk (intended for chucking purposes) to one that is 1” in
diameter and 1/4” wide (for joining the base to the platter.) Test the fit in the
1” hole on the bottom of the platter assembly. Get the surface surrounding the tenon
as flat as you can. If you must err, slightly concave is better than slightly convex.
chuck customized for the base of the stack. Modify
the tenon on the 2.5” disk (intended for chucking purposes) to one that is 1” in
diameter and 1/4” wide (for joining the base to the platter.) Test the fit in the
1” hole on the bottom of the platter assembly. Get the surface surrounding the tenon
as flat as you can. If you must err, slightly concave is better than slightly convex.
Join the Platter to the Base.
13. Fit the platter onto the base, without glue. Jam the top of the platter against
a flat surface (use thin foam padding) with the live center of the tailstock reaching
up into the hollow of the base. Check to see that the assembly runs true.
foam padding) with the live center of the tailstock reaching
up into the hollow of the base. Check to see that the assembly runs true.
14. If everything seems to be in order, remove the assembly from the lathe and apply
glue to the joint. Re-
15. Do the final shaping of the base and the transition region between the base and platter. Do the sanding. This completes the construction phase of the project.


Apply a Finish.
If you want either a gloss or semigloss finish, my suggestion is to use wipe-
If you prefer an oil finish, my suggestion is to use walnut oil although any oil that does not go rancid will work.
An oil and wax finish gives the benefits of an oil finish but produces a soft sheen. The wax also helps to seal the wood. A possibility is to use a mixture of mineral oil and beeswax that you prepare yourself. (See the article Preparing a Mineral Oil and Beeswax Finish on this site.)
After the finish has been applied and allowed to cure for a couple of days, the only thing left to do is ... bake a cake!