

Gouges, Part 5
Basic Sidegrain Turning
A sidegrain piece can be mounted on a faceplate or held by a scroll chuck. In this article, my suggestion is to use a small faceplate. This is for two reasons: first, a faceplate gives a more secure attachment, and, second, a scroll chuck requires a tenon to grip. If you can already turn a tenon on a practice piece, you may not need to be reading this article.
Preparing practice blanks. In my view, a spruce “2 x 6” from a big box store or
lumber yard is ideal for blanks for practicing sidegrain turning. A piece 6’ long
will make 12 blanks that should true up to a diameter of about 5”. It is already
flat so a faceplate can be attached easily. Of course it doesn’t have to be spruce.
Any “2 x 6” you can lay your hands on will work. However, do not use pressure-
Cut a piece 5.5” long that is free of large or loose knots, and find its center. Use a compass to draw a circle 5.5” in diameter on the piece. If you have a bandsaw, cut along the circle to form the blank. If you don’t have a bandsaw, use whatever means is available to remove the corners. This is as much a safety issue as it is a matter of convenience.
Attach a faceplate to the piece and install it on the lathe. Set the lathe to run at about 800 RPM. On my demonstration piece, I did not use a bandsaw but I did make one cut across each corner with a different saw.
The first objective is to true up the blank using a 1/2” bowl g ouge. Set the tool
rest parallel to the face of the blank. Rotate the blank by hand to see that it clears.
Stand to the side and start the lathe. Once it is running uneventfully, take a pencil
and scribe a heavy line onto the blank about 1” in from the edge. Turn the lathe
Off.
ouge. Set the tool
rest parallel to the face of the blank. Rotate the blank by hand to see that it clears.
Stand to the side and start the lathe. Once it is running uneventfully, take a pencil
and scribe a heavy line onto the blank about 1” in from the edge. Turn the lathe
Off.
Safety note: The tool rest serves as a guard rail, or fence, between you and the spinning wood. Make it a firm rule to never cross that fence with your hand, finger, thumb, or any part of your anatomy you want to keep. In particular, when the lathe is running, do not casually brush away the shavings that may come to rest on top of the tool rest. If you do, you can be into the spinning wood, with its rough corners, before you know it.
We have a problem. You need to know how to do sidegrain turning in order to true up a blank in order to learn to do sidegrain turning. This is were the assistance of an experienced turner would be helpful. However, we will simply pretend we already know how to do it and do it ourselves, with due caution, of course.
With the lathe Off, position the 1/2” bowl gouge for a basic cut just to the left of the pencil line on the blank. See that the bevel is rubbing with the flute closed. Verify that this position feels comfortable and stable. Then rotate the tool clockwise to open the flute. Turn the piece by hand, and you should get a shaving. This is just like what we did with the basic cut on the spindle.
Now start the lathe. Begin the cut just to the left of the line, and carry it all the way to the edge of the piece. Try to maintain the same depth of cut all the way to the edge. This is just for practice.
As the open spaces start passing by the tool, you will begin “turning some air.” In this region, you can no longer press the bevel against the wood. Guide the tool along the tool rest while keeping its orientation the same. Notice that the sound changes when you begin to turn air.
Stop the lathe. Examine the cut. Did it get deeper as you approached the edge,
where the open spaces began passing under the tool? If it did, you need to concentrate
more on guiding the tool. Start the lathe and try it again. Hopefully, this time,
the cut will be fairly uniform in depth from where you started, all the way to the
edge.
approached the edge,
where the open spaces began passing under the tool? If it did, you need to concentrate
more on guiding the tool. Start the lathe and try it again. Hopefully, this time,
the cut will be fairly uniform in depth from where you started, all the way to the
edge.
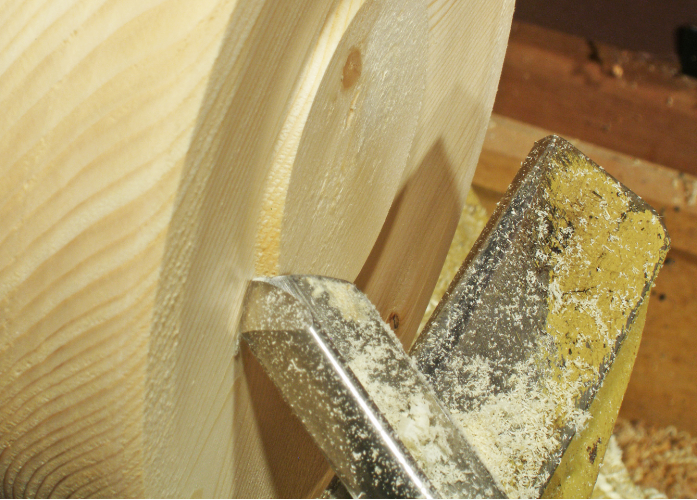
Reposition the tool rest so it’s about 45º to the blank, as shown in the photo below. Then, with the tool in the same orientation as for the previous cuts, slide the cutting edge along the tool rest so it takes just a light cut off the corners. Repeat this cut several times and then stop the lathe and examine your progress.


On your next try, as you approach the edge of the blank, swing the handle to the left a small amount to guide the cut deeper into the wood. What we’re doing is forming a convex surface that wraps around the edge of the piece.
Keep repeating this process until the edge is completely rounded over and the cut is approaching the back side of the blank. Reposition the tool rest so that it’s almost parallel to the lathe axis, and then continue making cuts until you reach the back side. At this point, the corners should be gone; the edge should be uniform all the way around.


By approaching the corners from the side, we were able to remove them with fairly smooth cuts. We turned a bit of air, but uneventfully. It would have been a very different matter if we had approached the corners straight on.
Clean up the back corner. Chances are you will get some  tearout and splintering
where the cut meets the back edge of the blank. A short wing cut pulled across the
corner can be used to smooth it out. Position the tool to the left of the corner,
handle well down, flute pointing to about 3 o’clock. This should put the cutting
edge in trail. Then simply pull the cutting edge against the corner, very briefly,
and this should clean it up.
tearout and splintering
where the cut meets the back edge of the blank. A short wing cut pulled across the
corner can be used to smooth it out. Position the tool to the left of the corner,
handle well down, flute pointing to about 3 o’clock. This should put the cutting
edge in trail. Then simply pull the cutting edge against the corner, very briefly,
and this should clean it up.
Pull cut across the edge. To clean and square up the edge, make a wing cut from
left to right across the entire edge. Position  the tool as you did to clean up the
corner, but be sure it doesn’t extend beyond the rest enough to give a heavy cut.
With the flute well over and the cutting edge in trail, simply pull the tool across
the edge of the piece. A uniform motion with constant pressure should yield a clean
surface.
the tool as you did to clean up the
corner, but be sure it doesn’t extend beyond the rest enough to give a heavy cut.
With the flute well over and the cutting edge in trail, simply pull the tool across
the edge of the piece. A uniform motion with constant pressure should yield a clean
surface.
Then for fun, make this cut in the opposite direction. Frequently, when you cut all the way to the edge, the wood at the edge will tear out and splinter. To avoid this, stop the cut just short of the edge, then finish with a cut in the opposite direction.
Wing cut across the face. A wing cut pulled from center to edge on the face of the disk can be used to flatten the face. which may have cupped during the drying process. This is just another cut, but the challenge is to get a straight cut so the resulting surface is flat instead of wavy.
Place the tool rest across the face of the disk. Start the lathe and then begin
the pull cut at the center. The handle should be fairly low, and the flute should
face the disk. You can make this a bevel-
This is a safe cut. It does not tend to catch because the cutting edge makes an acute angle to the approaching wood, and, with the handle held low, the curvature of the wings adds more stability. Additionally, you begin near the center where the surface speed is very low. However, if you go crazy and open the flute until it points upward to about 11 o’clock, you could, possibly, get a catch.


It may take more than one pass to level the surface if the disk is significantly cupped. Adjust the height of the tool rest if you have trouble starting the cut at the exact center. Rub your hand over the surface and feel for any unevenness. A straightedge held against the surface will show any gross peaks or valleys.
The practical application of this cut is leveling the bottom of a plate or platter. It’s not easy; experienced turners sometimes have their difficulties in this undertaking.
Basic tip cut across the face. This is simply applying the basic, bevel-
The method is simple. Place the bevel in contact with the wood in the neutral position, rotate the tool to open the flute and initiate the cut, and then swing the handle to guide the cut as it advances. Make the cut from the edge toward the center.
Plan to begin the cut, not at the edge, but on the face a fraction of an inch from
the edge. Initiating a cut on the edge brings up a new challenge, namely how to
begin a bevel-
Give it a try. First, make one complete cut from near the edge to the center. Can you do it without “dropping the cut” while leaving a clean, flat surface behind? That is your objective.

After you’ve made several passes trying to get a flat surface, make a pass where you guide the gouge on purpose to create waves. Remember: Swinging the handle guides the cut; rotating the handle controls the aggressiveness of the cut. If you swing the handle to guide the cut deeper, you may have to compensate by rotating the tool to give a less aggressive cut. That is, close the flute a bit.
It’s a small step from making a basic cut across the face to guiding the cut deeper
as you approach the center, which is the essen ce of hollowing out the interior of
a bowl or platter. A pronounced hollow can be produced quickly by a series of cuts
like those shown in the drawing at right. More about this is given in the next article.
ce of hollowing out the interior of
a bowl or platter. A pronounced hollow can be produced quickly by a series of cuts
like those shown in the drawing at right. More about this is given in the next article.
Don’t forget that if your practice blanks are mounted on a faceplate, the faceplate screws extend into the blank. Hitting the screws with your gouge tends to tear them up, and screws aren’t cheap.
Next up: using bowl gouges to rough turn a bowl blank.