

Lathe-
One of the big hassles in setting up a Beall buffing system is acquiring and setting up the motor to turn the wheels. The motor should turn at 1750 RPM and, further, it must turn in the right direction.
An alternative is to mount the buffing wheel on the lathe. Doing this allows you to avoid the hassle with the motor, and it also allows you to use the speed adjustment feature of your lathe to vary the speed of the buffing wheel.
T he Beall Tool Company makes an adaptor that fits into the Morse taper of the headstock
spindle. The combination adaptor supplied with the three-
he Beall Tool Company makes an adaptor that fits into the Morse taper of the headstock
spindle. The combination adaptor supplied with the three-
The Morse taper adaptor requires a drawbar to lock it securely in the Morse taper. Without the drawbar, the adaptor is likely to vibrate loose and come off the lathe. You must supply this drawbar, which can be made from a length of 1/4 – 20 threaded rod.
A Mandrel for Mounting a Buffing Wheel on the Lathe
There is a simpler way to mount the buffing wheel on the lathe. It consists of a
shop-
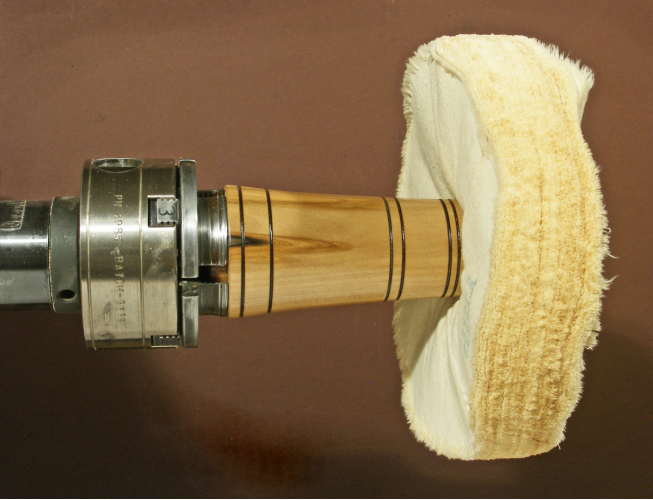


The mandrel can be made right on your lathe. All that’s required is a bit of spindle
turning and drilling three holes: one 3/4”, one 5/8”, and one 3/8”. By using a captured
nut (3/8 -
Making the Mandrel – step by step, short version
(1) Mount a piece of spindle stock 2.5” long and about 2.5” in diameter between centers. Turn a tenon on each end.

(2) Install the blank in a scroll chuck. Face off the end of the blank. Use a Forstner or spade bit to drill a 3/4” hole to a depth of 5/16”. Then switch to a 3/8” drill bit and continue the hole to a depth of 1”, measured from the face of the blank.
(3) Reverse the blank in the scroll chuck. Use a Forstner or spade bit to drill a 3/4” hole to a depth of 1”.
(4) Switch to a 5/8” Forstner or spade bit and continue the hole another one-
(5) Install the captured nut. One way to do it that ensures the nut will be properly
aligned is to use a 3/8” bolt as a guide. Insert the bolt through the blank as shown
in the following diagram, and screw the nut onto the bolt. Then use a hammer and
a short dowel to drive the nut in until it is seated against the end of the 5/8”
hole. Check to see that the mounting bolt of a buffing wheel will slip into the
3/8” hole and engage the nut.
nut will be properly
aligned is to use a 3/8” bolt as a guide. Insert the bolt through the blank as shown
in the following diagram, and screw the nut onto the bolt. Then use a hammer and
a short dowel to drive the nut in until it is seated against the end of the 5/8”
hole. Check to see that the mounting bolt of a buffing wheel will slip into the
3/8” hole and engage the nut.
(6) Re-
(7) The last step is to use a bit of epoxy to secure the captured nut. Be very careful not to let the epoxy run down into the threads of the nut. You can skip the epoxy if the fit of the nut is tight in the 5/8” hole.
(8) Install the mandrel in the scroll chuck, mount a buffing wheel on the mandrel, then look around and find something to buff.
A Longer Version
One method for making a longer version is to make the mandrel in two parts. The
first part is essentially the same as the one described above. The second is the
extension part, made with a recess so the tenon of the shorter version can be epoxied
onto the end of the extension. This technique avoids having to drill deep holes
and also having to work down into a deep hole to apply the epoxy to the nut. 

(1) Mount a spindle blank about 5.25” long between centers. Turn it down to a diameter of 2.5”. Form three tenons on the blank, as shown in the diagram above.
(2) Separate the two parts. Use a parting tool or a hand saw to make the cut. (Never apply a saw to a piece that is rotating on the lathe.)
(3) Make the part with the captured nut, following the procedu re given above. However,
do not shape the outer profile at this time.
re given above. However,
do not shape the outer profile at this time.
(4) Reverse the piece and shape the tenon that will fit into the recess on the extension. Make the tenon diameter about 1.5”.
(5) Mount the extension part in a scroll chuck. Make a recess to fit the tenon
you turned on the piece in the previous step. Test the fit of the two pieces, and
when you are satisfied that everything is in order, epoxy the two pieces together.
Use a cone center on the tailstock to ensure the two pieces are aligned and to provide
a bit of clamping pressure. For cosmetic purposes, align the grain in the two pieces.
in order, epoxy the two pieces together.
Use a cone center on the tailstock to ensure the two pieces are aligned and to provide
a bit of clamping pressure. For cosmetic purposes, align the grain in the two pieces.
(6) After the epoxy sets up, turn the outer profile. You can hide the join with a burn line. Add a couple more for decorative purposes. Apply a finish if you wish, and that’s it.
Final note: In use, when you install the mandrel in the chuck, use a cone center on the tailstock to press the shoulder of the tenon against the jaws of the chuck. This will ensure that it runs true.