

Part 3: Making Color Corrections
Adjusting the Color Balance
First of all, the terms “color balance” and “white balance” are used interchangeably. Both refer to the balance between the red, green, and blue components of the image. If the balance is off, the image will exhibit an overall color cast and the colors will not appear “true to life.”
White balance. Unless you have a camera that permits you to do a custom white balance
for your lighting setup, the image will probably exhibit an overall color cast because
the presets on your camera do not match your lighting exactly. This may introduce
an overall yellowish tint, or perhaps blue or green, or some mixture that’s hard
to identify. In any event, the colors in the image are not true.
your camera do not match your lighting exactly. This may introduce
an overall yellowish tint, or perhaps blue or green, or some mixture that’s hard
to identify. In any event, the colors in the image are not true.
Our objective in this article is to make color corrections to an image where the balance is way, way off. It’s the image we cropped in the previous article. It’s shown at right.
Using Quick Edit. Before we launch into a fully manual color correction in the Expert editor, let’s try the Quick edit and see what happens.

With the image opened in the editor, we select the Quick version at the top of the screen.
At the top of the options panel, click on Smart Fix. A smaller panel will drop down.
This panel shows how the image will appear if you select one of the nine presets
(by moving the sl ider), but let’s not do that. Instead, click the Auto button near
the bottom of the panel. The result is shown at right.
ider), but let’s not do that. Instead, click the Auto button near
the bottom of the panel. The result is shown at right.
It’s an improvement, maybe, but an overall color cast still remains. This is typical
of the one- g programs have. However, without
doing anything to the image, go down lower on the screen and click on Color. A new
panel will open, shown at right.
g programs have. However, without
doing anything to the image, go down lower on the screen and click on Color. A new
panel will open, shown at right.
Now prepare to be amazed. Click on Auto at the bottom of the panel. Bang! Perfection
has been achieved. My color picker (explained below) tells me that the background
is an a lmost perfect neutral gray, which is what we aim for (because the background
is a neutral gray in real life).
lmost perfect neutral gray, which is what we aim for (because the background
is a neutral gray in real life).
I must admit that I’m impressed. Perhaps we might tweak the brightness and contrast a little, but as it stands, the image is not bad, not bad at all. Incidentally, the wood is from an ornamental plum tree that died standing on the stump.
Using the Expert Editor. Given the success obtained with the Quick editor, it might seem unnecessary to go any farther. However, the Quick editor does not always work quite as well as it did for the image above. So, to the manual corrections we go.
An option that can save a lot of work is to let the Quick editor make the initial corrections, as we did above, and then switch over to the Expert editor to do the final tweaking. For this article, I will not go that route. Let’s get started.

Open the image in the Expert editor. Then click on Enhance at the top of the screen, and hover your mouse over Adjust Color, then move over and down and click on Color Variations at the bottom of the flyout menu.

When you do this, a rather imposing dialog box appears, as shown at right.
At the top are Before and After images that show the result of the changes you make. The Before image doesn’t change, but the After image changes with each adjustment.
On the left there is item 1: “Select area of image to adjust.” The default setting is Midtones. Leave it there unless you have reason to select one of the others.
At the bottom left is item 2, a very important setting: “Adjust color intensity.
Amount:” The small slider determines the am ount of change in color generated by
each click you make. It’s default is in the middle, and this corresponds to very
large, almost drastic changes. For most images, I move it all the way to the left.
ount of change in color generated by
each click you make. It’s default is in the middle, and this corresponds to very
large, almost drastic changes. For most images, I move it all the way to the left.
The group of eight thumbnails is the place you make the corrections. Simply click
on a thumbnail, and it will do what its label says. For example, clicking on Decrease
Red will decrease the red component of the image an amount determined by the slider
of item 2. When you click, the correction is reflected in the After image at the
top.
corrections. Simply click
on a thumbnail, and it will do what its label says. For example, clicking on Decrease
Red will decrease the red component of the image an amount determined by the slider
of item 2. When you click, the correction is reflected in the After image at the
top.
Clicking more than once on a particular thumbnail adds to the effect. If you click on Decrease Red but do not like the effect you get, you can reverse that by simply clicking on Increase Red.
Changing the color level has the side effect of also changing the brightness of the image a small amount. The two thumbnails at the far right, Lighten and Darken, allow you to adjust the brightness of the image as you make the color corrections.
You can change the slider setting (Item 2) at any time. For example, large corrections may be appropriate at first, but as you get closer to having a good balance, smaller changes may be in order.
When you think you have it, or when you want to check your progress on the full-
Let’s do it! To get started, we examine the small color-

But this image was made under tungsten lights with the camera set to daylight, so I know it has way too much red and not nearly enough blue. So, with the slider of item 2 in the middle, which corresponds to “drastic,” I click once on Decrease Red and twice on Increase Blue. The result is at right.
Hey! Pretty close, for only two clicks. No I didn’t cheat, but I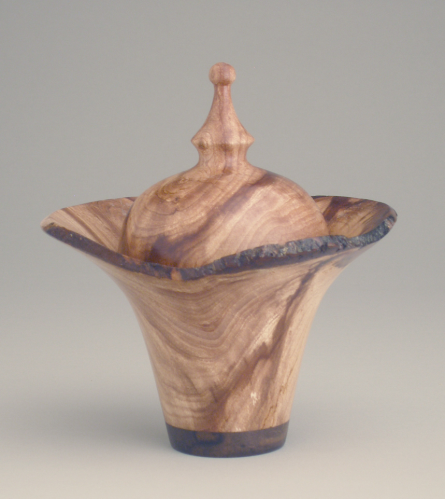 ’ve done this a
few times before, and I’ll take being lucky any time. However, the image looks a
bit dark. Let’s go back to where we were and try the Lighten thumbnail. After two
clicks of Lighten, the result is ... at right.
’ve done this a
few times before, and I’ll take being lucky any time. However, the image looks a
bit dark. Let’s go back to where we were and try the Lighten thumbnail. After two
clicks of Lighten, the result is ... at right.
Well, the image got lighter but now it lacks contrast and the colors are washed out. Let’s backtrack and take a different route. Click Undo at the bottom left of the screen to get rid of the Lighten adjustment. Then go to Enhance at the top and select Brightness/Contrast, as we did in the previous article.
By increasing the brightness by 50 and the contrast by 30, we get an image that is
brighter without having that flat, washed-
get an image that is
brighter without having that flat, washed-
At this point, let us digress and check out another color adjustment, namely the saturation. This refers to the intensity or strength of the color. Colors with low saturation appear faded and washed out; colors with high saturation values appear unnaturally brilliant. This is illustrated in the two images below where the saturation was changed by 30% in opposite directions.


The Saturation Adjustment. It’s in the same flyout menu as Color Variations, the
second item on the list in fact. That is, Enhance > Adjust Color > Adjust Hue/Saturation.
Clicking on the item opens a dialog box with three sliders, one of which is the saturation
control.
Enhance > Adjust Color > Adjust Hue/Saturation.
Clicking on the item opens a dialog box with three sliders, one of which is the saturation
control.
Another slider, Hue, adjusts the overall tint of the image, as in a greenish tint, bluish tint, and so forth. The only use I’ve found for it is in special effects; it is useless for making color corrections, in my opinion.
The other slider is Lightness. It does the same thing as the two thumbnails in the color variations dialog box, and should be regarded with the same skepticism.
OK, where or when might you use the saturation adjustment? In some images where
the contrast must be boosted considerably, the saturation of the colors increases
as well. This can give an unreal appearance unless you compensate by reducing the
saturation. On the other hand, reducing the contrast can also produce washed-
Also, an image that is underexposed or one that is taken in dim light (dusk) is likely
to have low-
A Little Trick with an Eyedropper – More about Color
I have a hard time judging when the colors in an image are correct. Further, I’m not sure my monitor is anywhere near being set up to show the correct colors. There is a way to work around these shortcomings.
At the bottom of the toolbox are two overlapping squares tha t show the foreground
and background colors currently selected (used in more advanced editing). When you
click on these squares, a dialog box will appear that allows you to select a foreground
color. The dialog box is shown at right.
t show the foreground
and background colors currently selected (used in more advanced editing). When you
click on these squares, a dialog box will appear that allows you to select a foreground
color. The dialog box is shown at right.
When you move your mouse out of the dialog box and onto t he image, the mouse pointer
becomes an eyedropper. When you click with the eyedropper, it samples the color at
its tip and displays “the numbers” in the dialog box.
he image, the mouse pointer
becomes an eyedropper. When you click with the eyedropper, it samples the color at
its tip and displays “the numbers” in the dialog box.
At the lower right of the dialog box are the numbers associated with the colors, red, green, and blue, or R G B. The numbers range from 0 to 255. Higher numbers correspond to more of the particular color present at the point the eyedropper sampled.
For example, pure red would be 255, 0, 0. Pure green is 0, 255, 0. Pure white is 255,255,255, and pure black is 0,0,0.
Here’s the punch line: when a shade of neutral gray is sampled, all three numbers will be the same. A dark gray will have low numbers, such as 50, 50, 50; a light gray will have higher numbers, such as 180, 180, 180.
So how do you use this little tidbit? Turnings are typically photographed in front of a neutral background, typically white or a light gray. In the image, this background appears in varying shades of gray, depending upon how much light falls on the background at a particular point. This means that if we use the eyedropper to sample the color at a point on the background, the three numbers, R G B, should be the same if the white balance of the image is correct.
On the other hand, if we sample a point on the background and the numbers are 160, 140, 140, the implication is that we have too much red and we should therefore Adjust Color to reduce the red in the image.
A tiny little complication. In addition to the direct light that falls on the background, reflected light from the turning does as well. This reflected light alters the color of the background as it appears in the image. If you sample different parts of the background, you will see that the unbalance between “the numbers” varies from point to point as a consequence of the reflected light.
However, all is not lost. The edges of the background and the upper corners probably receive less reflected light and are therefore closer to being a pure shade of gray. If we sample these areas, it is likely that the numbers will closely represent the true overall color cast (or lack of it) in the image.
For example, if the upper right hand corner gives a sample of 113, 110, 92, we should increase the blue to bring it more in line with the red and green.
Finish the Job
Before we wandered off to consider saturation, hue, and eyedroppers, we were in the
process of correcting the color balance for the little box. We got to the point
where the image appeared as shown at right after we adjusted the brightness and contrast.
To finish the job, we will use the eyedropper trick to indicate the corrections we need to make. So, here we go.
We click on the two squares (foreground – background colors) to open the color picker dialog box. Moving the mouse out of the dialog box and onto the image causes it to become an eyedropper.
 When we sample the shadow area just to the left of the base of the box, we get, for
R G B, 180, 175, and 167. This indicates an excess of red and a deficiency of blue.
Further, clicking all around the upper regions of the background gives numbers with
the same bias toward the red. Therefore, we will reduce the red and increase the
blue, each by one click.
When we sample the shadow area just to the left of the base of the box, we get, for
R G B, 180, 175, and 167. This indicates an excess of red and a deficiency of blue.
Further, clicking all around the upper regions of the background gives numbers with
the same bias toward the red. Therefore, we will reduce the red and increase the
blue, each by one click.
Now we’re wanting to make only small changes because the  image is already close to
having a good balance. Therefore, we move the slider (item 2 in the color variations
dialog box) all the way to the left. We don’t need “drastic” at this point. The
result of making the corrections is shown at right.
image is already close to
having a good balance. Therefore, we move the slider (item 2 in the color variations
dialog box) all the way to the left. We don’t need “drastic” at this point. The
result of making the corrections is shown at right.
Now, quite frankly, I can hardly see the difference. However, clicking in the same
area as before, the numbers are 165, 162, and 160. The red is still a bit strong
and the blue a bit weak, but these are really close. Clicking around the background
gives similar results. 
One more time: Let’s give the blue one more click. Here’s the result.
The eyedropper test on the background above the level of the finial now reveals an almost perfect neutral gray, the numbers being within a couple of points of each other. The foreground still shows an excess of red because of reflected light from the turning.
Now that the image has been cropped, the brightness adjusted, and the color problems eliminated, it is time to resize it for publication to the web. That’s the topic of the next article.
Back to Top Next Article: Resizing