

Sanding, Part 2
Power Sanding
Three challenging blemishes are often found on a piece once you begin sanding, and each one is rather difficult to remove by traditional sanding. These are (1) a deep scratch that runs parallel to the circumference; (2) a ring of scuffed or compressed grain; and (3) a region of torn grain.
The deep scratches probably result from grains of abrasive that are much too large for the stated grit; sandpaper is not perfect. Scuffing and compression may result from rubbing the bevel (especially the heel) on the wood, and torn grain often arises even when you use sharp tools and the best cut.


With traditional sanding (stationary sandpaper, spinning workpiece), the relative motion of the abrasive is parallel to the deep scratchs or the compression rings, and this is not at all effective. Having the abrasive move at an angle to them is far superior. This is achieved by power sanding.
Power Sanding
This refers to using a sanding disk mounted on a pad turned by a drill. It is usually done while the piece is still mounted on the lathe with the lathe either turned off or rotating slowly. One advantage of power sanding is that you can sand at an angle to tangential scratches. Another is that you can spot sand, concentrating the sanding action where it is needed, on a region of torn grain, for example.
The drill needs to be reversible. In some cases the disk will tend to bounce or run across the surface. This problem often can be solved by reversing the direction of rotation.
A drill with variable speed will give you more control, and in my view, is essential.
An angle drill is more convenient to use but many turners use standard in-


Pads come in varying degrees of firmness. A soft pad will conform better to the
interior of a bowl but a firmer pad is best for leveling a surface. The hook-
You can purchase interface pads that go between the regular pad and the sanding disk. These allow you to use the same pad in the drill but select a firmness that suits your needs. The interface pads also protect the main pad should overheating become an issue.
The technique is about what you would expect, but I would suggest you use a practice
bowl for your first attempts, one that is fairly shallow and which does not have
an in-
Pads are available in diameters of 2” and 3”. An experienced turner suggests that you should use the largest pad the work will allow so that you bring more abrasive to the task. For your initial efforts, however, a 2” pad might be the better choice – less stuff to tear stuff up with.
With the lathe Off, place the disk in contact with the surface. Tilt it to the side so that it does not make full, flat contact. With only very light pressure applied, start the drill at a slow speed and see what happens. Then try reversing the drill. You will soon learn what works and what doesn’t, and how much pressure you need to apply.
It’s possible for the edge of the disk to grab and send the drill into a rapid orbit inside a bowl or off the edge on the outside. This is less likely to happen if you do not apply significant pressure until the disk is in motion.
After you get a bit of experience, you will be able to hold the drill with one hand and steady or rotate the piece with the other. At first, however, you may wish to lock the spindle and hold the drill with both hands. However, this is not supposed to be a forceful affair.


Power sanding with the lathe running. If you wish to power sand over a large area
of the piece, it is convenient to start the lathe at an RPM near the bottom of its
range and apply the drill/disk to the rotating piece. This will give a more uniform
surface. An additional advantage is that you can apply the disk more or less flat-
Don’t miss the point that if the piece is rotating, the jaws of the chuck will be rotating as well. Don’t let the drill drag you into an altercation with them.
What’s the best speed? Depends on who you ask; preferences vary over a wide range. There is, however, no harm done in using a speed that’s fairly low. As long as sanding dust is produced in what appears to be a normal manner, the process will be working. In such case, there is probably little advantage to be gained by using greater speeds, either for the lathe or the drill.
Excessive speed will overheat the pad and result in its destruction. Stop periodically and feel the pad. If it’s just warm to the touch, that’s OK. If it’s hot, it’s not. A hot pad will not last very long.
If you find the cutting action has slowed, or a scratch is particularly difficult to remove, resist the temptation to increase the speed and press harder. This will only increase the heat produced and will tend to burnish the wood. What you should do is either get a new and sharp disk of the same grit, or drop back to a lower grit.
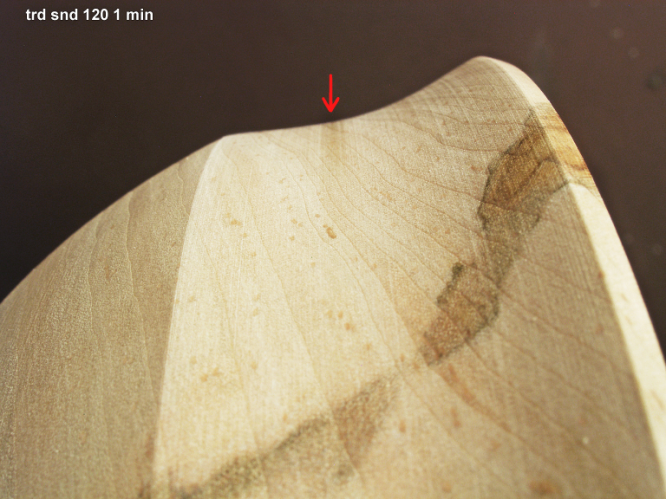
A case history. The following photos of a small maple bowl were taken during the initial sanding phase. The third photo shows rather prominent tool marks near the rim. These were produced by shear scraping when I advanced the tool across the surface way too fast for the RPM of the lathe. But, may I add, the camera tends to accentuate any flaws on the surface.


I began with traditional sanding near the rim using 120-


After power sanding, I used traditional sanding with 320 and 400-
Abrasive cleaning sticks are used to clean disks or belts that have loaded up with
dust. They act like a big eraser and will often restore a badly-
The sole of an old crepe-
Save every shuck. (old farming expression) The way most turners use them, disks
tend to wear more on the outer third than in the center. However, almost half the
abrasive area is located in the inner two-
Overall, power sanding is easy and can be very effective in what would otherwise be difficult situations. For me, learning about it represents one of the bigger steps I’ve taken so far in trying to become a turner.
Up next: Odds, ends, and a few tips, plus links to articles and sources.