

Scrapers, Part 2
More Properties of the Burr; Shear Scraping
The Curl of a Burr
This term is sometimes used to describe a burr, as in “The burr tends to curl back over the top face of the tool,” or “The burr seems to exhibit a significant curl.” In my thinking, the geometry of the burr produced by grinding is not sufficiently well defined to take the term at face value. I have not seen one that exhibited a smooth, curved surface that even remotely resembled a curl.
However, aggressive grinding will produce a burr whose ragged peak is set back from the edge of the bevel, and in a cut, such a burr will act as if it curls back over the top face of the tool. Even though the concept of a curl may not be totally accurate on the microscopic level, it does communicate the fact that the peak of the burr is not in line with the bevel. It provides a model that makes it easier to visualize the characteristics of a burr. Therefore, I will use the term because it is rather descriptive.


The Floating Burr
Sometimes when a burr having a mild curl contacts the wood, the burr will simply
ride over the surface rather than engaging the wood. Then when the burr is pressed
against the surface it will suddenly take hold and cut rather aggressively. Not the
end of the world, but a bit annoying.
wood. Then when the burr is pressed
against the surface it will suddenly take hold and cut rather aggressively. Not the
end of the world, but a bit annoying.
The wood acts as if there is a surface tension of some sort that tries to keep the surface from being punctured. Once the surface is broken, waste wood is then ejected over the top of the burr in a normal manner.
The problem here is the curl of the burr. The solution is to remove it and reform a burr with less curl.
Pointing a Scraper Downward
It is often suggested that a sure-
However, . . . if the burr has a significant curl, pointing the tool downward will
have just the opposite effect. The burr will be aimed directly into the wood which
will make the problem worse. A heavy cut is likely to follow.
downward will
have just the opposite effect. The burr will be aimed directly into the wood which
will make the problem worse. A heavy cut is likely to follow.
A secondary effect is that a force will be exerted on the tool that tends to pull
it across the tool rest toward the workpiece. This is the self-
Testing the Burr
What matters is how a newly-
1. Rounded edge. Does not cut, even when the cutting edge is forced against the wood. It may even burnish the wood a small amount.
2. Keen edge but no burr. Will produce shavings when pressed against the wood. The depth of cut increases as more pressure is applied. Very controllable. Good for hard, gnarly wood.
3. Burr in line with the bevel. This is the preferred burr in most cases. Cuts readily. Depth of cut will increase with pressure.
4. Too much burr. Even when in line with the bevel, a burr that is too prominent will cause the tool to be grabby and hard to control.
5. Edge and burr pushed back; mild curl. Does not cut upon initial contact but with pressure will suddenly take hold and cut aggressively. Raising the handle makes it more aggressive.
6. Heavy curl. Does not cut on initial contact nor effectively with moderate pressure. Raising the handle may cause it to grab and cut aggressively to the point of being uncontrollable. It will tend to self feed.
It’s a simple matter to make a test cut on a practice spindle to see how a scraper behaves. This may be particularly helpful during your initial experience or when experimenting with a new sharpening technique.
The test results are easy to interpret. If the tool doesn’t cut no matter what you do, it probably has a rounded edge. Having to apply pressure to get it to cut implies the cutting edge is pushed back. If you must raise the handle, the burr has a heavy curl.
Burr vs. Bevel Angle
When you grind a scraper, or for that matter any turning tool, the nature of the
burr produced is strongly dependent upon the included angle at the cutting edge.
Included angles range from a low of about 30° for a long-
The strongest burrs are produced at angles near 90°. At smaller angles, say around 70°, the burrs will be larger but also weaker. And this trend continues. At angles around 45° the burrs become so large and weak that they are no longer useful as a part of the cutting edge. They simply break away the first instant they touch the wood.
An interesting thing happens when the included angle reaches 90°. The burr disappears.
No burr is produced when the included angle is greater than 90°. This refers to M2
high speed steel; it may not be the case for other materials.
angle is greater than 90°. This refers to M2
high speed steel; it may not be the case for other materials.
This is more than just a curiosity. If you propose to grind a negative rake scraper (described later) and the angle between the bevels turns out to be more than 90°, it will be impossible to form a burr at the cutting edge.
I think there may be a simple explanation for why no burr is produced at a bevel angle greater than 90º. During grinding, the wheel advances into the steel. As soon as the burr is produced, it is run over and ground away by the advancing wheel. For angles less than 90º, the wheel still advances but the burr manages to barely stay ahead, and it survives.
At the other end of the spectrum, a type of scraper that I find very useful has an included angle of only 35º. (Some people call it a skew.) A totally different method of sharpening is used and a large part of the sharpening process is devoted to getting rid of the burr. Why get rid of it?
It is so weak that it will inevitably break off and leave a blunt edge. In order to end up with the sharpest possible tool, it is preferrable to go ahead and get rid of the burr and repair the damage by honing and polishing during the sharpening process.
The Best Bevel Angle
Opinions vary as to what the included angle between the bevel and top face of a scraper should be. An often suggested value is 70°. Some use angles as low as 60°. My preference is 76°, but I don’t fret if it varies a degree or two.
The burr will be stronger at higher angles but other considerations come into play. One is that clearance must be provided under the cutting edge so the heel of the bevel does not make contact with a concave surface like the inside of a bowl.
At a relatively low angle such as 60°, inadvertently loweri ng the handle may cause
the cutting edge to dig into the wood. Also, my impression is that the lower angle
makes the tool harder to control. For a larger angle like 76°, lowering the handle
will cause the bevel to begin to rub the surface and lift the cutting edge out of
the wood.
ng the handle may cause
the cutting edge to dig into the wood. Also, my impression is that the lower angle
makes the tool harder to control. For a larger angle like 76°, lowering the handle
will cause the bevel to begin to rub the surface and lift the cutting edge out of
the wood.
Why did I choose 76°? First I gravitated toward the higher angles based on the strength
of the burr and the bevel-
Practical Aspects of Sharpening
OK, so you decide to grind the bevels on your shapers to 76° or some other angle you prefer. How do you do set the angle with any sort of precision without having expensive tools? Turns out it’s not hard at all.
Almost every grinder has a tool rest, a platform you can use to position items for presentation to the grinding wheel. It can be adjusted to various angles. My suggestion is to make a template for setting the tool rest and you will be good to go.
The template is basically a stick with the desired angle cut on one end. The details
are shown in the photo. Once you have the template, use it to adjust the tool rest
so the template makes contact with the grinding wheel as it should.
on one end. The details
are shown in the photo. Once you have the template, use it to adjust the tool rest
so the template makes contact with the grinding wheel as it should.
You can use a protractor or other angle-


Once the tool rest is set, place the scraper flat on the rest and ease it up against the grinding wheel. Move it back and forth as required to bring each portion of the bevel into contact with the wheel.
My grinder has no tool rest. Instead, it has a level platform in front of each wheel
on which I rest my hand while sharpenin g freehand. My method is shown in the following:
We have already seen several photos and diagrams relating to honing so there is little to add at this point. The most common problem I observe is a difficulty in keeping the hone flat on the bevel. Failing to do so often results in a rounded cutting edge.
Here are my suggestions for giving yourself the best chance of doing it successfully. First, you must rest the scraper on a stable surface, which might be the corner of a table. Next, you must be able to sit or stand comfortably in a stable position where you plan to do the honing. Leaning over the corner of a table is neither comfortable nor stable.
And finally, you must have good light. You need to be able to see when the surface of the hone makes contact with the cutting edge.
Then it’s just a matter of doing it. Place the hone against the bevel and adjust the angle until you feel it “seat” flat against it. Then do the swirling motion all around the bevel and you will soon be done.
A story: An email friend complained that her scrapers d idn’t cut very well. I suggested
she grind and hone them to form the burr, and so forth, which she did. She reported
back later that now her scrapers wouldn’t cut at all. Reckon what happened? I suspect
rounded-
idn’t cut very well. I suggested
she grind and hone them to form the burr, and so forth, which she did. She reported
back later that now her scrapers wouldn’t cut at all. Reckon what happened? I suspect
rounded-
Feeling the Burr
The burr from a grinder is easy to feel; it is prickly, and it gives the impression of some serious sharpness. That’s not what you’re looking for when forming a burr by honing. Instead, the best burr may be one that’s so small it’s impossible to see and almost impossible to feel.
One technique for detecting a burr is to drag the soft pad of your (less-
Being able to feel the burr is not essential. If you go through the steps carefully and if the scraper cuts as if it has a burr, you can safely assume you have one even if you can’t feel it.
Burnishing a scraper is one of the harder things to get right, and the hard part
is knowing how hard you should push the scraper against the burnishing pin. If you
press too hard, you can wind up with a pushed-
For your first attempt I suggest mounting a spindle blank on your lathe so you can make test cuts as you go along. Then prepare the scraper for burnishing: grind the bevel, hone the top, hone the bevel then hone the top again. However, do not go to the burnisher – yet. Do a test cut first so you have a benchmark to work from.
After grinding, honing, and removing the burr, the scraper should have a keen edge. It should lift shavings from the test piece when you press it gently against the spinning wood. Press harder and you should get more shavings. This is your benchmark.
Now give the scraper one light stroke against the burnishing pin and repeat the test. Does it behave differently now? Does lifting the handle a small amount, by chance, make it cut more readily? Give it another stroke across the burnisher and try it again.
Hopefully after a few tries you will arrive at a burr that works nicely without getting
a severely pushed- how can you tell if the cutting edge is
pushed back? Lift the handle a small amount, as described in an earlier section.
how can you tell if the cutting edge is
pushed back? Lift the handle a small amount, as described in an earlier section.
If you go too far and get the scraper all messed up, you can always start over and try it again.
Shear Scraping
With this method the scraper is not laid flat on the tool rest but is rotated to
an angle of 45º or more. This brings the cutting edge more in line with the approaching
wood so the wood encounters the edge at an acute angle instead of 90º. This is called
a shearing cut and the method is known as shear scraping. It is widely used because
it offers several significant advantages.
edge more in line with the approaching
wood so the wood encounters the edge at an acute angle instead of 90º. This is called
a shearing cut and the method is known as shear scraping. It is widely used because
it offers several significant advantages.
The primary advantage is that the shearing cut typically leaves a much better surface. On the other hand, the 90º angle of flat scraping is the worst possible orientation in regard to producing tearout and torn grain.
The depth of cut is sensitive to how hard you press the cutting edge against the wood. Press harder and you get a deeper cut. This is a very useful property when you are fine tuning the outside of a bowl or the surface of a hollow form. By swiping the tool very lightly across the surface, you can take off as little material as you wish. This is not the case for a gouge in a traditional cut because it has to be guided, which is not easy to do in a very light cut.
These two photos show the quality of the surface you can get with shear scraping. Nothing fancy here: just an ordinary scraper with a burr formed with a hone. The wood is poplar.


Considerable latitude exists for the type of burr placed on the cutting edge. A burr with a significant curl presents no problem because a small change in the orientation (swing) of the tool will compensate for the curl.
An additional benefit is that as long as you are careful to follow one simple rule (see below), you can forget about getting catches You have to pull the cutting edge against the wood to get it to cut. Pull harder and you get a deeper cut. Ease up for a lighter cut. You have complete control.
One new turner was afraid to let the tool contact the w ood without it being flat
on the rest. The concern was that the wood would grab the tool and slam it down hard.
Rest easy; this won’t happen as long as (1) the active part of the cutting edge is
toward the lower part of the tool; and (2) you follow the rule given below for avoiding
catches.
ood without it being flat
on the rest. The concern was that the wood would grab the tool and slam it down hard.
Rest easy; this won’t happen as long as (1) the active part of the cutting edge is
toward the lower part of the tool; and (2) you follow the rule given below for avoiding
catches.
Remember, shear scraping can be done with the bottom wing of a gouge but a dedicated scraper brings more steel to the task.
Avoiding catches while shear scraping. The wood ex erts a force on the cutting edge
that causes the tool to try to skate backwards and away from the cut. This is good
because it lends stability to the whole process. Further, because the tool is anchored
on the tool rest, the skating action causes it to pivot about the anchor point. As
a result, the end of the tool, when it skates, travels in the arc of a circle.
erts a force on the cutting edge
that causes the tool to try to skate backwards and away from the cut. This is good
because it lends stability to the whole process. Further, because the tool is anchored
on the tool rest, the skating action causes it to pivot about the anchor point. As
a result, the end of the tool, when it skates, travels in the arc of a circle.
Here’s the way to avoid catches:
Always position the tool at such an angle so that when it skates,
the cutting edge swings away from the wood into thin air.
In many cases, this position will occur naturally; you don’t even have to give it
a thought. But, it’s easy to wander into risky territory, as shown in this photo.
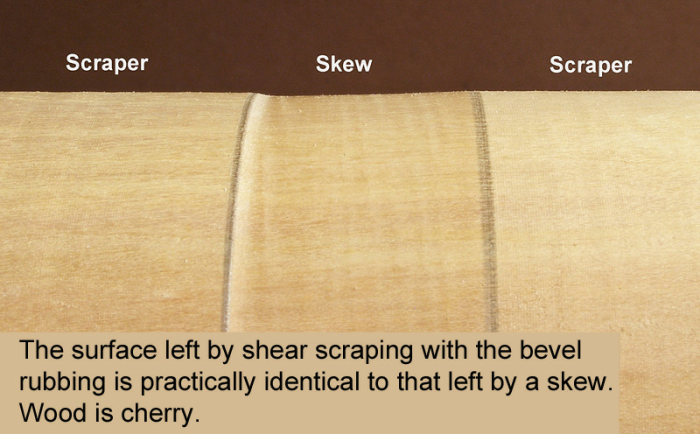
Shear scraping with the bevel rubbing. Even though you don’t hear much about this technique, it will work as long as the burr is in line with the bevel. Grinding and honing is the best way to produce such a burr.
The advantage of rubbing the bevel is that the tool is easier to guide. It handles much like a gouge in that the depth of cut is much less sensitive to pressure. Further, slight irregularities in the rate at which you advance the cut have practically no effect. The following photo is a comparison of the surface left by shear scraping with the bevel rubbing and the surface left by a skew.

The nominal orientation of the tool that will result in a bevel- with a rotation of about 45º relative
to the tool rest. This should place the cut on the lower half of the tool. Fine tune
the orientation by placing the bevel against the wood and rotating the lathe by hand
to see if you get a shaving.
with a rotation of about 45º relative
to the tool rest. This should place the cut on the lower half of the tool. Fine tune
the orientation by placing the bevel against the wood and rotating the lathe by hand
to see if you get a shaving.