

Spalted Wood, Part 2
In Part 1, various methods are described for mounting spalted or degraded wood on the lathe. This section addresses the issues that arise in roughing out the form. Finish turning is covered in Part 3.
Roughing out the Form
Once the piece is mounted on the lathe, the real fun begins – that of shaping the profile and trying to get a clean cut. It’s at this stage that the true character of the wood will be revealed. As you make the initial cuts, you will begin to see what lies inside, and the resulting surface will indicate what problems may lie ahead.
My method. The following is based on what I typically do to rough turn a bowl out
of borderline punky, spalted willow, usually from a standing dead tree that contains
a lot of moisture. Willow doesn’t turn very well in any case, and if it’s degraded,
it’s even worse. Why do I do it? I like the look and feel of the finished pieces,
and it’s a challenge. This represents just about the worst-
While turning a lot of crappy willow may not be in your plans for the immediate future, these same techniques can be used for other degraded wood, which will usually be less demanding.

I begin by bandsawing a blank from a half log and attaching a faceplate. Unless the blank is seriously degraded, I don’t bother with adding CA to the screw holes. I put the blank on the lathe and bring up the tailstock for support.
Roughing out the outside profile. I start shaping the outside of the piece with
a 1/2” bowl gauge, fresh from the grinder. Early on, I may take “medium” cuts just
to get rid of the waste wood quickly. The result often is stringy, rough, and disaster-
These two photos show what you might encounter. Also, they show the difference between
turning wet wood and dry wood, for willow at least. The wet blank was freshly cut
from a standing dead tree and had a moisture content of about 90%, determined by
weighing wet and dry samples of the wood. Regretfully, it had degraded without significant
spalting. 

When I get to within about a half-

The next two photos show the gouge in a bevel-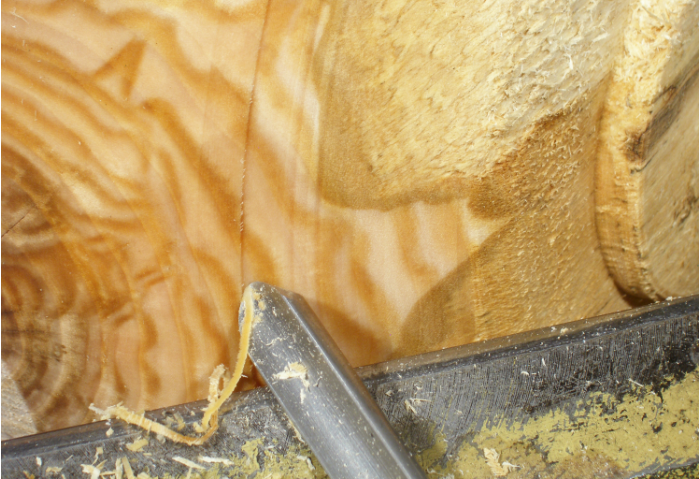

Another cut that usually gives a better surface than the straightforward application
of a roughing gouge is that of a smaller gouge with a longer bevel used in a pull
cut. Again, the handle is held low to give a shearing action. During the cut, the
tool can be pulled toward you, or it can be pushed away. The cutting action is
not exactly the same for both directions and some difference in the resulting surface
may be observed. A slight self-


The tool that leaves the best surface is the skew. Sometimes with a troublesome piece, a skew is the only tool that will produce a decent surface without resorting to fortifying the wood with lacquer sanding sealer or other material. However, I’m the first to admit that maneuvering a skew over the curved surface of a bowl in a meaningful and productive manner is not something to be taken lightly.
For pieces several inches in diameter, I find a radiused skew to be much easier to control than one that has a straight cutting edge. A variation on the radiused skew is the Sorby Spindlemaster. (See the article on skews.)


When faced with monstrous tearout, you may be tempted to simply use course sandpaper to “turn away” the last quarter inch to get to the final surface. This brute force method has some issues. First, if you do the sanding with the lathe running, the surface will not wear away evenly; the piece will go out of round quickly and you will wind up with a lumpy surface. If you stop the lathe and employ power sanding, you will be effectively “carving” the bowl instead of turning it, and your chances of getting a good, uniform surface are slim.
Form a tenon. At some point, once the outside profile is pretty well established, I form the tenon for mounting the blank in a scroll chuck. This may entail pulling the tailstock back briefly to clean up the end of the tenon, but then I return it to support the piece.
Clean up the rim. It’s probable that the top of the rim is a surface left by a chainsaw or bandsaw so now is a good time to clean it up. Here is a quick way to do it with a bowl gouge so that there is no difficulty in initiating the cut, and the confining space between the rim and the headstock housing is not a problem. Take a look at the following photos.
In the first, the tool rest is parallel to the axis of the lathe, positioned near
the rim. The handle of the tool is kept low to give a shearing cut, desirable because
of the degraded wood. This is not a bevel-
The second shot is with the lathe running and the tool being pushed across the rim, more or less parallel to the top of the bowl.
*


Taking stock. Given that this is the roughing-
However, if the wood is relatively dry, it is beneficial to work to within one or two light cuts of the final surface and then apply sanding sealer as described below.
Sanding sealer? If it appears that extra measures will be required to get a clean final surface, I brush on a heavy coat of lacquer sanding sealer that has been thinned about 25% with lacquer thinner. I apply the sealer to the tenon as well. The sealer penetrates the wood quite readily.
The sealer must be given time to dry for it to be effective in firming up the wood. To reap its full benefit, it should be allowed to dry for at least 24 hours before attempting another cut. In the meantime, I usually proceed to hollowing the interior.
Hollowing the interior. After the sealer is dry enough to handle (takes only a
few minutes), I install the piece in a s croll chuck using the tail center to align
the piece. Only then do I remove the faceplate. Then I bring up the tailstock for
support and do as much of the hollowing as possible with the tailstock in place.
croll chuck using the tail center to align
the piece. Only then do I remove the faceplate. Then I bring up the tailstock for
support and do as much of the hollowing as possible with the tailstock in place.
The first objective is to simply rip out the waste wood, with out tearing anything
up, and this process goes quickly. Typically, I begin hollowing by using the bottom
wing of a bowl gouge, pulling the cut from a point near the tail center toward the
rim. This can be an aggressive cut as long as you don’t work too closely to the
rim. The shavings really fly.
out tearing anything
up, and this process goes quickly. Typically, I begin hollowing by using the bottom
wing of a bowl gouge, pulling the cut from a point near the tail center toward the
rim. This can be an aggressive cut as long as you don’t work too closely to the
rim. The shavings really fly.
*


To minimize the possibility of having a section of the rim split away, I use the
gouge in a traditional cut to remove the waste wood near the rim. I aim for a wall
thickness about 10% of the diameter of the bowl, in accordance with the rule of thumb
 that many turners follow.
As I continue, I usually switch back and forth between the two cuts mentioned already until a pronounced hollow is produced. Then two issues arise. One is how to remove the wood from the wall area just below the rim; the other has to do with the pedestal at the center which develops next to the tailstock. As it turns out, neither is an issue at all.
For the wall area just below the rim, I use the bottom wing of the gouge in a manner
similar to that used to clean up the rim, described above. The flute faces the wall
and is well down. The handle may be lowered to give a shearing cut, which is advanced
by pushing and arcing the tool along the wall. The handle stays more or less parallel
with the axis of the lathe so that the tailstock doesn’t get in the way.
described above. The flute faces the wall
and is well down. The handle may be lowered to give a shearing cut, which is advanced
by pushing and arcing the tool along the wall. The handle stays more or less parallel
with the axis of the lathe so that the tailstock doesn’t get in the way.
To reduce the diameter of the pedestal, I use what is almost a traditional cut for
a bowl gouge, but the cut is directed down the side of the pedestal along a line
more or less parallel to the lathe axis. This is a bevel-


After the tailstock is pulled back, the wall thickness is reduced as desired using the customary cuts with a bowl gouge. However, because a lot of the supporting wood has been removed from near the rim, only light cuts should be attempted in that area from this point on in order to avoid vibration and chatter, which can sometimes occurr if the wood is dry.
If the sides of the bowl are steep so that using a gouge is a bit of a problem, I
will use a round-
Interior surface quality. Fewer options exist for using the tools to get a clean surface on the interior of a bowl; the rim gets in the way and limits the range of movement of gouges, and you cannot use a skew on a concave surface. What you are left with are the traditional cuts with a gouge, pull cuts with the bottom wing of a gouge, and shear scraping.
The key to getting a clean surface with degraded wood is the shearing cut where the
wood fibers are severed as they run along the cutting edge. The shearing effect
is increased by presenting a gouge with the handle held low, both with the traditional
cut and bottom-
On the other hand, a round- and one can reach every point of the interior unless
the bowl has a pronounced in-
and one can reach every point of the interior unless
the bowl has a pronounced in-
The roughing is complete. After the interior is hollowed, I typically weigh the
roughed-
x