

Spalted Wood, Part 3
This is the last part of the series on working with spalted and degraded wood.
Final Turning and Finishing
The final, finish turning is done only after the roughed-
All the while, try to get clean cuts with the tools. You can use the same tool techniques as used for roughing out the form, but with an added provision: always take a very light cut. The final cut should be so light that only dust is produced with only a fine line appearing between the cut and uncut regions.
In trying to get a clean surface, some experimenting is required because the same
tool will not work best in all circumstances. A shearing cut gives better odds for
getting a smooth surface. Also, the direction of the cut sometimes has a significant
effect, so try the various cuts in both directions. (The always-
My observation is that you cannot depend on degraded wood to hold sharp, crisp detail. Small beads, for example, may be fine on one side of the piece but may tend to crumble away on the other where the wood is more degraded. It is good to keep things simple and use gradual curves rather than crisp lines to define the form.
A blank to finish. The following photo shows a blank of willow just under 8” in diameter that is completely dry and ready for the final turning. But first, before we jump into finishing the piece, perhaps I should explain why there’s a pedestal with a tenon inside the bowl.
Because I use tailstock support as much as possible, even when hollowing the interior
of a bowl, the pedestal occurs naturally unless I go ahead and remove it. (See part
2.) I’ve found that if I l eave the pedestal and form a tenon on it, I can mount
the piece securely between a scroll chuck and the tail center when I return to finish
the bowl.
eave the pedestal and form a tenon on it, I can mount
the piece securely between a scroll chuck and the tail center when I return to finish
the bowl.
This works at least as well as using a jam chuck, and I believe it does a better
job of centering the piece, especially if it has warped signficantly. If the tenon
on the pedestal has gone oval, I place its long axis between opposing jaws of the
chuck and don’t worry about the other two because the tail center ensures that the
piece rotates about its original axis.
tail center ensures that the
piece rotates about its original axis.
With the piece mounted in this manner, the entire outer profile is free and clear, including the rim. Plus, there is no possibility that the piece can move off axis, which can sometimes happen when internal jam chucking is used where friction alone keeps the piece in place. I can work all the way to the rim with confidence.
Leaving the predestal doesn’t seem to affect how the piece behaves as it dries. I always turn the pedestal down to a level below that of the rim so that I still have the option of jam chucking the piece against a flat plate. It works for me.
Using lacquer sanding sealer. If the wood tends to tear out and leave a badly pitted surface, I brush on a coat of lacquer sanding sealer to fortify the wood near the surface. The sealer is thinned with lacquer thinner by about 25%.
For the sealer to be effective, it must be allowed to dry until the surface feels rough and prickly instead of moist and tacky. The time it takes to dry depends upon the condition of the surface and how heavily the sealer is applied. A rough surface with a heavy coat may take three hours or more, but a light coat on a smooth surface may be worked within an hour.
Here’s another indicator that the sealer has dried enough to be workable. The sealer will usually darken the wood noticably when it is first applied, but it will lighten as it dries. When it returns to very nearly the original appearance, perhaps with a bit of an amber cast, it is probably ready.
You can make only one or two light cuts for a given application of sealer. If you cut into the surface beyond the depth to which the sealer has penetrated, you will be working unfortified wood and the problems with pits and tearout are likely to return.
If the one or two cuts you are allowed are not enough to clean up the surface and remove the pits, apply another coat of sealer and repeat the process. You should see an improvement in the surface with each cut. If the surface gets worse, something is wrong. You may be taking a cut that is too heavy or using the wrong tool.
The elapsed time for all this may be days. It can’t be rushed. If you decide to remove the piece in order to free up the chuck, be aware that the piece may not run perfectly true when it is reinstalled, or you may have a bit of trouble getting it to run true.
The sealer is rather effective but some pits and tearout may persist despite your best efforts. End grain is more troublesome than side grain, and the results vary with the type and quality of the wood. Small, shallow pits can be sanded away.
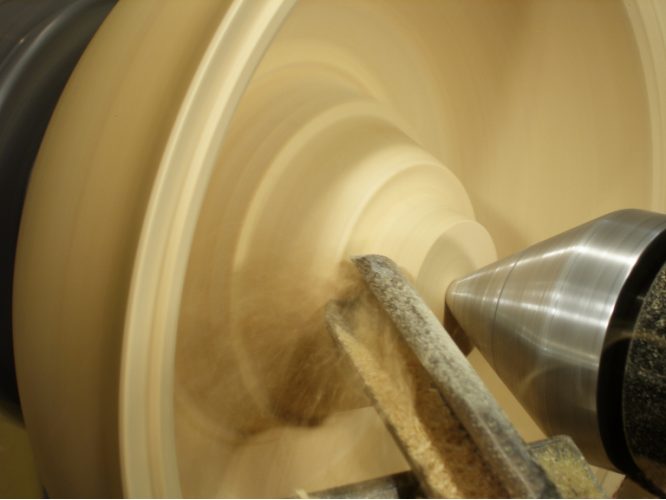
Back to the blank: outer profile. The following photos show the sequence of events
in working the outer profile. I used a shearing pull cut with the bottom wing of
a gouge. 

Only one coat of sanding sealer was applied. I tried sanding even while a lot of
pits remained, and it worked – the pits went away. This blank doesn’t have significant
hard and soft spots, so I was able to do considerable sanding without having the
surface become uneven. (Sanding degraded wood is discussed farther down.)


Using thin CA glue to fortify the surface. Some people swear by it, but I don’t like it. I don’t use it except when drastic measures are required for a small spot or two on a piece. Here’s why.
It makes the wood very hard and non-
It is not easy to apply uniformly over a large area. Further, obnoxious fumes are produced as it soaks into the wood. It is just nasty stuff and it is not cheap, but I wouldn’t want to be without it.
Complete the interior of the blank. After sanding the outer profile and then coating
it with sanding sealer, I reversed the blank in the chuck in order to hollow and
finish the interior. I still u sed tailstock support, with the tail center set against
the top of the pedestal.
sed tailstock support, with the tail center set against
the top of the pedestal.
The four main tasks at this point are (1) establish the desired wall thickness; (2) detail the rim; (3) remove the pedestal; and, (4) make the final finishing cuts. Because the wood in this blank is fairly sound, I decided to take a chance on forming a bead around the inside of the rim.
The quality of the wood (or lack of it) will dictate the types of cuts you will have
to use to get a clean surface. If possible, I will use a bowl gouge in a traditional
cut to remove most of the waste wood. My next choice is to use the bottom wing of
a gouge in a shearing cut in order to have better control over very light cuts as
I refine the surface. Finally, I switch to a round-

After the pedestal is gone and the tailstock pulled back, a bowl gouge often can
be used in a conventional cut to remove part of the waste wood. It’s a good idea
to work from the rim toward the bottom in a series of steps, taking each step to
the final surfac e as you go. This minimizes the risk of getting vibration and chatter
at the rim.
e as you go. This minimizes the risk of getting vibration and chatter
at the rim.
However, if it appears that the surface will require sanding sealer to give a clean cut, I reduce the wall thickness all the way to the bottom and then apply the sealer. It is a bit impractical to use the sealer in steps because of the time it takes it to dry. After this, I only use very light shear scraping as necessary to get the final surface, and I do work all the way to the rim if need be.


Sanding
If you use lacquer sanding sealer to get a clean cut, let the piece sit for a day or so to give the sealer a chance to cure completely – sealer, uncured, gums up sandpaper.
The primary issue with sanding spalted wood is that the soft parts sand away more rapidly, resulting in an uneven surface. For this reason, you must be alert while sanding the traditional way, by holding sandpaper against the rotating piece. This is especially true for the lower grits, say 150 or below. Stop if the surface begins to be uneven.
There are two alternatives to traditional sanding. One is to do it purely by hand with a liberal use of elbow grease. The other is to employ power sanding where a drill or rotary tool does the work. Both methods allow spot sanding. You can sand where it’s needed and stay away from the soft areas that tend to wear away quickly.
You must be very careful with course sandpaper such as 100 and 120 grit. Not only will it remove a lot of wood in a hurry, perhaps producing a flat spot or depression, it can possibly produce tearout and pits of its own. Because the wood is degraded, the higher grits, say 180 or 220, will be very effective in smoothing the surface as long as the resulting dust is cleared. You probably will not need the lower grits.
The most difficult situation to deal with is where a narrow vein of soft, punky wood runs through an area that is harder. Unless you are extremely diligent in staying away from the soft vein, you will wind up with an unsightly gulley. This is one of the cases where I will consider using thin CA to firm up the soft wood.
As a general rule, sanding degraded wood to higher than 320 grit is not beneficial. Enough wood fibers get torn from the surface, leaving tiny trenches where they were, that sanding with 400 grit doesn’t make the surface any smoother. However, no two pieces are the same, so you play this by ear.
After sanding, I brush on a coat of sanding sealer. This firms up the newly-
Reverse chucking – completing the foot. At some point the tenon has to be removed and the turning completed at the foot of the bowl. I prefer to wait until after most of the finishing work is done so that the piece can be held by the chuck while I’m applying the finish. You may prefer to do remove the tenon at this stage so that all the turning is done before the finishing process is started. Either way is fine.


Applying the Finish
The finish I use almost exclusively is lacquer based. I begin with lacquer sanding sealer and, if I want a glossy finish, end up with lacquer from a spray can. Occasionally, if I want a more durable surface, I will use polyurethane for the top coat. In either case, the first step is to use sanding sealer to build up a smooth surface, hopefully free of pits and other imperfections.
At some point you must decide which will be more appropriate for the piece, a high-
Some will say that a high-
My favorite finish for the spalted, punky willow pieces is one where, at first glance, the surface doesn’t appear to have any finish on it at all. The impression is that of smooth, bare wood so that when you touch the piece, you are in contact with the wood. However, the wood is far from bare. Almost always, many coats of sanding sealer have been applied to get the smooth surface, but most of it has been sanded away.
The process. The first objective is to establish a foundation layer of sanding sealer. This may turn out to be more difficult than you would at first think. What you may observe is that when the sealer is applied, it immediately soaks in and practically disappears. When you apply the next coat, it does the same thing.
Here’s what’s happening. The first coat soaks in. Given enough time, it will dry and effectively seal the surface. However, the second coat redissolves the first coat, and the soaking continues.
What needs to happen is for the second coat to be applied in such a manner that it doesn’t have a chance to redissolve the first coat. To make this more probable, give the first coat enough time to dry in depth, which will take a lot longer than for it to become simply dry to the touch.
Then, for the second coat, do not use sealer that has been thinned. Use it straight from the can, or, go a step further and use sealer that has been left in an open container to allow some of the solvent to evaporate. Then brush on the second coat without making multiple brush strokes in the same area.
I have tried various tricks to try to reduce the soaking, but I’ve not found anything that works any better than the brute force method of applying coat after coat until a continuous surface is obtained.
Once a solid film is established, the piece will be just like any other as far as applying the top coat is concerned. (See the article on applying a lacquer finish.)
If you want the “bare wood” look, do not apply either gloss or satin lacquer as the
top coat. Stay with the sanding sealer. After a durable film has been built up,
use 400-