

Tiny Tools for Tiny Turnings
How to make tools for fine detail. (Part 1)
Sometimes, when working on ornaments, finials, and so forth, you will encounter a
situation where regular turning tools are too large for some parts of the project.
You can make smaller tools for these details using commonly available materials and
without special metal-
Tools you can make include scrapers, parting tools, V-
Some tools require heat treating and tempering of the steel.This may be new to you
because this is not a skill that every woodworker has. Even so, it is not hard to
do nor is it time consuming at the very bas ic level required for these tools.
Most of the tools described in this article are on the scale of less than 1/4”. For example, the round nose scraper is 3.5 mm wide (just over 1/8”). You can scale them up and make them larger, or perhaps go the other way and make them even smaller.
I’m not sure a lot of tools at this scale are available for purchase. But who would want to buy them if you can make them – what’s the fun in that?
Tools Required
Assuming you go all out and get into bending metal, you will need or find convenient
(1) A bench vise with metal jaws; (2.) A propane torch; (3) Heavy-
Grinding and shaping the cutting edge forms a large part of making a tool. Therefore you will need your grinder, a diamond hone, and whatever other sharpening aids you have at hand.
Possibilities for Materials
The steel used for a cutting edge must be hard if it is to be effe ctive. An ordinary
nail or bolt will not work because it is too soft to hold an edge, and it cannot
be hardened.
ctive. An ordinary
nail or bolt will not work because it is too soft to hold an edge, and it cannot
be hardened.
Here is a list of some readily available items that can be used:
(1) Allen wrenches, the black kind.
(2) Masonry nails. Round and flat versions are generally available but some may not be long enough for this application.
(3) Small files. Triangular files for sharpening saws; round files for chainsaws; other small “riffler” files.
(4) Screwdrivers, round and flat. The “bit” part at least is hardened on all but the cheapest screwdrivers. And, the handle is already in place.
(5) Flat countersink bits, the kind not worth hauling home.
(6) Music wire. The wire commonly used for the landing gear on model airplanes is 5/32” in diameter and is available at most hobby shops.
(7) Drill bits (shank part). While possible to use, the flute gets in the way in many cases. Also, the shank may not be hardened to the same degree as the cutting end, but it can be hardened.
(8) Reciprocating saw blades. While many people use them for parting tools, they are too thin and flexible for my taste. I would avoid them.
(9) Commercially available tool steel. This is an option if you need a size or shape not provided by those listed above.
File Test for Hardness
A file will not cut hardened steel but will just skate across the surface. On the other hand, if a file will bite in and cut the metal, the metal is too soft to work well as a cutting edge.
This test does not tell you anything about whether the steel can be hardened. It simply indicates the “current state” of the metal. For example, an Allen wrench that has been softened (details below) can be shaped with a file and then rehardened. After hardening, the file will not cut the metal.
Cutting Hard Steel
Forget the hacksaw. The only way to cut hard steel is by grinding. For making small tools, a Dremel or other rotary tool with a metal cutoff disk is ideal.
If you don’t have such a rotary tool, you can score the blank with the corner of a grinding wheel then break the blank by clamping it in a large vise and hitting it with a hammer. Be aware that hard steel is sometimes brittle and will shatter when abused in such fashion.
An exception: if you soften a hard steel, like an Allen wrench or a file, you can then cut it with a sharp hacksaw.
Heat Treatment, the Basic Idea
Suppose we have an Allen wrench we wish to bend. If we simp ly clamp it in a vise
and go at it with a big hammer, it is likely to break. A better approach is to soften
the steel, make the bend, and then reharden it.
ly clamp it in a vise
and go at it with a big hammer, it is likely to break. A better approach is to soften
the steel, make the bend, and then reharden it.
To soften a hard steel, heat it to cherry red (about 1500° F) and then allow it to cool slowly. You can slow the cooling by withdrawing the flame gradually rather than shutting it off all at once.
To harden steel, you heat it to cherry red and then cool it very quickly by dunking it in water or oil as the requirements dictate. This is called quenching. For our purposes, quenching in water is good enough.
Quenching from high temperature typically produces a material that is too hard and brittle. In such case, you must soften it a controlled amount. This process is called tempering and is done by reheating the material to a medium temperature (about 450° F) and quenching it again.
Make a Tool – Round Nose Scraper
I’ve used round masonry nails, Allen wrenches, and 5/32” music wire for this project, but if this is your first attempt I would suggest using a 1/4 or 5/16” Allen wrench. The slightly larger diameter is easier to shape on the grinder.
This project requires no heat treatment so you have the option of making the handle
first and then using the handle to hold the tool at the grinder. The handle can be
a simple spindle or you can go all out and make a showpiece. The tool goes into a
hole drilled in one end of the handle.
of making the handle
first and then using the handle to hold the tool at the grinder. The handle can be
a simple spindle or you can go all out and make a showpiece. The tool goes into a
hole drilled in one end of the handle.
Incidentally, a tiny tool does not necessarily mean that you should use a short handle. A longer handle will provide more control and greater precision when doing fine detail on a tiny turning.
The first step in making the tool is to cut the bend off the Allen wrench so you are left with just the straight section. However, …
You may elect to straighten the bend rather than to simply cut if off. This will give a longer blank. In this case, straighten the bend and then reharden the blank before going on to the next step. (The details of bending, rehardening, and tempering are given farther down.


Measure the diameter across the flats. Use a drill bit this size when you drill the hole in the handle. This will give a tight fit but will allow the blank to be driven in. With the tight fit, no adhesive will be required.
The hole in the handle can be drilled on the lathe, on a drill press, or even drilled with a hand drill. The alignment of the Allen wrench and handle does not have to be perfect in order to end up with a useful tool.
Grind off any burrs that may make it more difficult to seat the Allen wrench in the hole, then drive it in.
Once the handle and Allen wrench are joined, proceed with shaping the cutting edge.
Flatten a 1/2” section at the end by removing almost one-


You must not overheat the tool during the grinding process. Place a cup of water near the grinder and dip the tool in the water frequently. This is not high speed steel. Overheating (bluing the metal) will soften the steel and make it impossible to get a good cutting edge.
Shape the nose of the tool. Begin by removing the corners at the tip. Then remove the new corners that result. Finally remove the high spots until you end up with a smooth contour. It does not have to be a perfect semicircle. In fact, you may prefer some other shape.


Form the bevel angle at the tip of the tool. Hold the tool horizontal at right angles
to the grinding wheel, handle to the right. With the top of the cutting edge aimed
directly away from the wheel, swing the handle end toward you until you get the angle
you desire.
from the wheel, swing the handle end toward you until you get the angle
you desire.
Once you get the angle you desire on the tip (recall that scraper bevels are pretty steep having included angles of 70° or more), carry that angle around to the sides. Be careful not to cut into the contour of the cutting edge as seen from the top.


A grinder running at full speed can be rather aggressive on small tools. A trick is to turn the grinder ON for a few seconds, then turn if OFF and do the grinding as it winds down. You can mess up a tool more slowly this way.
After the grinding comes the honing. Use a diamond hone to smooth the top surface and the bevel. Hone the top surface to remove the burr that will develop. Then form the keeper burr with a final honing of the bevel. (See the article on scrapers, this site.)


Your tiny tool is now ready to use. Because of its small shank, it cannot be extended beyond the tool rest more than about an inch at the most.
Caution: When working with small tools on a course grinding wheel, you must NOT
aim the tool directly into the oncoming abrasive. It can grab with dramatic consequences
because of its small-
Now before we consider making other tools, let’s look at the heat treatment process in more detail.
Heating to Facilitate Bending
The idea is simple enough: metals become easier to bend when heated to near “red hot” temperatures. Beyond that, there’s not a lot to explain. Heat the metal and try to bend it. If it doesn’t bend, heat it some more. Depending on the tools you are using, it may take more than one heating to get the full bend.
For small Allen wrenches and masonry nails, you may be able to make the bend by griping the hot blank with two pliars, placed one on each side of the bend. Larger items may require claming in a vise and using a hammer. Here the difficulty is heating the blank and then getting it into the vise before it cools down.
Be aware that when you heat a steel blank, you will be giving it an impromptu heat-
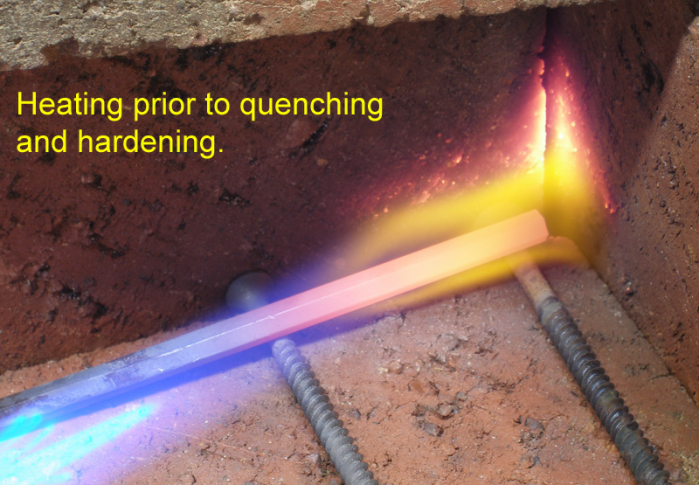
Hardening
The important point is that you must get the blank to a temperature approaching 1600° F before quenching in order for the hardening to be effective. This is cherry red, or a fully realized “red hot.” A simple “looks kinda red in dim light” is not hot enough.
I emphasize this point because with a propane torch it can sometimes be difficult to get the blank that hot. However, this is not so much an issue with small blanks for small tools. But with, say, a 3/8” Allen wrench, it becomes more of a problem.
To make the torch more effective you might arrange brick s to form a corner to concentrate
the heat and prevent air circulation from carrying the heat away. Also, direct the
flame along the length of the blank as opposed to straight across it. The hottest
part of the flame is out near the end, not the part back next to the torch.
s to form a corner to concentrate
the heat and prevent air circulation from carrying the heat away. Also, direct the
flame along the length of the blank as opposed to straight across it. The hottest
part of the flame is out near the end, not the part back next to the torch.
Do not clamp the blank in a vise while trying to get it to hardening temperature. Heat will be lost via conduction to the jaws of the vise, which will get quite warm, and this will slow down the heating process significantly or even make it impossible to reach the proper temperature.
Once the blank is up to temperature, quickly quench it by dunking it in water. Swirl it around. Let it stay in the water until it is completely cool. About 30 seconds in the water is good, perhaps less for a small blank.
Tempering
A steel blank that has been hardened by heating and quenching must be tempered in order to make it somewhat softer and less brittle. For our purposes, the procedure is to heat the blank to about 450° F and then quench in water.
Compared to hardening, tempering is a gentle process. The required termperature is
biscuit-
Judging the temperature is done by watching the oxidatio n colors that appear on a
clean steel surface as it is heated through the range from roughly 400° to 600° F.
The colors indicate the temperature rather accurately. The following photo shows
a masonry nail that was sanded to shiny metal and then heated slowly by applying
the flame to the head.
n colors that appear on a
clean steel surface as it is heated through the range from roughly 400° to 600° F.
The colors indicate the temperature rather accurately. The following photo shows
a masonry nail that was sanded to shiny metal and then heated slowly by applying
the flame to the head.
I observed that as the nail heated up, a pale yellow first appeared just to the right of the head. A progression of colors then moved to the right as the heat traveled along the length of the nail toward the small end. When the colors reached the stage shown in the photo, I removed the flame and quenched the nail in water.
The temperature we will be looking for is in the range from 430° to 450° F. This corresponds to the pale yellow and is typically referred to as being “straw.” When we temper a blank for a tool, we heat the blank until the cutting edge turns the straw color and then quench to stop the process.
The first step in actually doing it is to sand an area near the cutting edge to shiny metal; this is typicallly done on the top surface – it depends on the tool. It’s also important to keep the surface free of oil or other contaminants.
Direct the flame from the torch at a spot well back from the cutting edge. The idea is to heat up that spot and let the heat gradually migrate to the clean surface we prepared. You must use a low flame or the colors will move so rapidly that you will overshoot the target color of “straw.” I suggest trying it on a practice blank before you do the real thing.
If you do overshoot “straw” and continue to purples and blues, the metal will become softer and tougher but will not hold an edge as well. In the extreme, you may have to reharden the blank and start over. When in doubt, hone the cutting edge, and with a makeshift handle, try the tool on a spindle blank and see what it does. If it will take an edge and hold it, you are good to go.