

Vacuum Chuck for Spheres
It is sometimes desirable to mount a sphere on the lathe to sand the finish after the turning, shaping, and perhaps some finishing are done. The sphere could be mounted between cup centers, but better access to more of the surface is obtained by mounting the sphere on a small vacuum chuck.
This article shows one that I think is the simplest to make. It requires turning a Morse taper but a simple trick takes all the guesswork out of that.
And here it is:


It is held in the bore of the headstock spindle by the friction fit of a Morse taper
which also provides an airtight seal against the bore of the headstock spindle. An
O-
This will not work if your system uses a coupler with a rod through the spindle. Four alternative methods that avoid conflict with the rod are suggested at the end of this article.
The ID of the O-
Make it!
The first thing to do is select or acquire the O-
Begin with a spindle blank about 2” in diameter and perhaps 3.25” long. Mount the blank between centers, true it up, and turn a tenon on one end.
Mount the blank in a scroll chuck. Drill a 1/4” hole to a depth of about 2.5” .
.
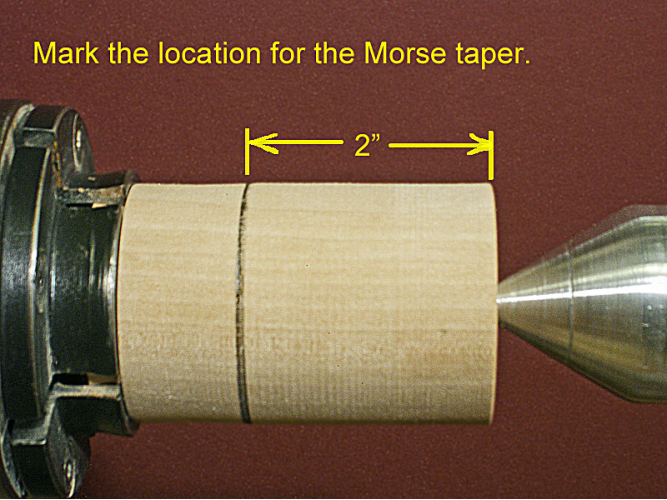
Install a cone center at the tailstock and bring it up for support. Mark a 2” section on the tailstock end where the Morse taper will be formed.
Reduce the Morse-

Shape the Morse taper.
Mark a line 1/4” from the bottom of the cup. Just to the right of the line, use a parting tool to establish a diameter of 0.7” (approximately 23/32” or 17.8 mm). This is the largest diameter of a standard #2 Morse taper.
At the end of the blank, which is 1.75” to the right of the line you drew above,
establish a diameter of 5/8” or about 15.8 mm.
A uniform taper between these two reference diameters will be very close to the final dimensions of the Morse taper. We will fine tune the taper as we proceed.
Make preliminary cuts to begin establishing the taper but be careful not to go too far. Then do a trial fit of the taper.
Remove the tail center and, with the lathe OFF, carefully move the quill up over the taper you are trying to cut. When contact is made, turn the handwheel in order to burnish the surface of the taper. The burnished areas indicate where additional wood needs to be removed.


Replace the tail center for tailstock support, and refine the taper, removing the burnished regions. Then do another trial fit. As the taper gets closer to its final form, you will find the quill will slide farther onto the taper before contact is made. Also, because the area of contact will gradually increase, the burnish marks will become less conspicuous.


Continue this process until your taper will fit inside the quill to the desired depth.
It’s a good idea to leave extra space (the 1/4” offset) near the bottom of the cup
because, in use, the taper will be compressed a small amount and the taper will then
extend into the bore a greater distance.
The fit of the taper does not have to be perfect but it’s important that the fit be good enough to provide an airtight seal and provide the friction necessary to spin the chuck.
Turn the cup and fit the O-
After the taper is complete, remove the blank from the chuck and insert the newly- apply. You don’t want to jam the taper in the bore of
the spindle.
apply. You don’t want to jam the taper in the bore of
the spindle.
Turn off the end of the blank to leave room for a cup about 7/8” deep overall. Clean
off the face and then hollow the cup and fit the O-


If you have trouble with the taper coming loose while turning the seat for the O- threads of the spindle. A bit of moisture
applied to the wooden taper will definitely tighten it enough to hold, but the hazard
is getting it totally stuck in the bore of the spindle.
threads of the spindle. A bit of moisture
applied to the wooden taper will definitely tighten it enough to hold, but the hazard
is getting it totally stuck in the bore of the spindle.
In use, I did not coat the O-
Variations
You can scale up the cup to accommodate an O-
If your vacuum setup uses a coupler with a rod that runs through the bore of the spindle, you will not be able to use the Morse taper method for mounting the chuck. However, there are several alternatives.
One method is to make a chuck that screws directly onto the headstock spindle. No
seals other than the O-


Another possibility is to mount the sphere chuck on a small faceplate, say one 3”
in diameter. If you decide to permanently dedicate a faceplate to this application,
all that’s required is to screw a blank to the faceplate and shape the chuck. A thin
layer of closed-


Here’s a method that does not require a dedicated faceplate. Simply turn a chuck that fits over the faceplate. A layer of foam will cover the holes and provide an airtight seal. Under vacuum the chuck will be held securely on the faceplate.


It might be convenient to make a sphere chuck that piggybacks onto a vacuum chuck you already have. In this case it is important for the fit between the two to be accurate enough so that the sphere chuck centers properly and runs true. The vacuum will hold the sphere chuck in place.


Note on closed-