

Gouges, Part 4
Cutting on the Wing
The basic cut described in the previous article is fundamental, but a gouge with
a swept-
In the articles on this site, I will refer to this as a wing cut a nd will refer to
the basic cut described in the previous article as a tip cut. This refers more directly,
I think, to whether the cutting is done near the tip of the tool or out on the wing.
nd will refer to
the basic cut described in the previous article as a tip cut. This refers more directly,
I think, to whether the cutting is done near the tip of the tool or out on the wing.
The wing cut is versatile. You can bring impressive shavings out of a bowl if you lay into it, or with a very light touch, you can smooth a surface by removing only tiny shavings or even dust. Also, it makes use of more of the cutting edge than the basic cut and therefore reduces the required trips to the grinder.
The cut may or may not be a bevel-
In the bevel-
Roughing cut on a spindle. In my view, there are roughing cuts, and there are very roughing cuts. A piece of a crooked tree limb with uneven bark is very rough. A piece of square spindle stock with the corners still present is less rough, but is still very rough as I see it. A straight spindle having a fairly smooth surface is only rough even though it may have a lot of the bark still on it.
The point is that it is hardly worth the effort to attempt a bevel-
For your first try at using a wing cut, mount a spindle blank on the lathe. True
it up with your spindle roughing gouge so you don’t have the added complication of
an out-


Place the gouge near the tailstock end of the blank with the flute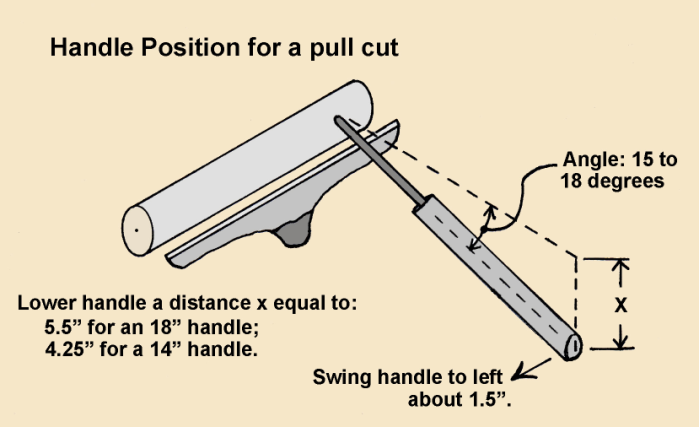 pointing to about
8 o’clock. Tilt the handle down quite a bit, maybe 15 to 18º, with the handle swung
about 5º to the left. This should place the cutting edge of the bottom wing in contact
with the wood. The bevel will not be rubbing.
pointing to about
8 o’clock. Tilt the handle down quite a bit, maybe 15 to 18º, with the handle swung
about 5º to the left. This should place the cutting edge of the bottom wing in contact
with the wood. The bevel will not be rubbing.
Now press the cutting edge against the wood to make an indentation. This indentation
should appear as a line that points to the right, about 20º off the vertical. The
more the indentation tilts from the vertical, the more aggressive the cut will be.
If it points straight up, or points to the left, it won’t cut at all.
indentation. This indentation
should appear as a line that points to the right, about 20º off the vertical. The
more the indentation tilts from the vertical, the more aggressive the cut will be.
If it points straight up, or points to the left, it won’t cut at all.
With the tool held lightly, rotate the lathe by hand and note that you don’t get much of a shaving, if any at all, and that’s good. The cutting edge is supposed to be in trail, and if it is, you will have to apply pressure to the tool to get it to cut.
After checking the angle of the indentation and verifying that pressure is required to get a cut, you can start the lathe, knowing that nothing bad is going to happen when you touch the tool to the wood. So, go ahead; do it. Once the cut is initiated, pull the tool to the left, without changing the swing of the handle, and you should be in business.
Play around with this for a while. Try changing the position of the flute and the swing of the handle and see what effect it has. As long as you keep the cutting edge in trail, nothing bad will happen. Also, try the cut from the other end of the blank, cutting from left to right.
To get a uniform cut, you have to move the tool at a constant speed across the surface
with a constant, uniform pressure against the wood. If you hesitate at a certain
point, you can dig a gulley. This is of little concern in a roughing operation but
becomes important when making light, finishing cuts.
across the surface
with a constant, uniform pressure against the wood. If you hesitate at a certain
point, you can dig a gulley. This is of little concern in a roughing operation but
becomes important when making light, finishing cuts.
Here’s something else you can try. Although this cut requires an applied force to make it advance, it will cut pretty well if you “advance” the cut in the opposite direction. Place the tool near the middle of your practice spindle as if you were going to make a cut toward the left, as you did above. Then press the cutting edge against the wood to initiate the cut. But this time, don’t pull it to to left. Let the tool drift slowly to the right, as it will tend to do all by itself, and you will see that it cuts as it goes.
In the pulling mode, you must supply the force to advance the cut. Going in the other direction, it tends to advance all by itself (self feed). I find it much more difficult to move the tool at a constant rate when it’s tending to self feed, and the surface I get is not as smooth. Therefore, I seldom use the “backwards” cut when I’m making a finishing cut or trying to smooth a surface.
Bevel-
Near the tailstock end of a trued-
The exact position the handle must assume depends on the height of the tool rest and how much the bevel wraps around (or turns in at) the top of the flute. Adjust the tool rest so the handle tilts down comfortably.
Now start the lathe. To be conservative, present the tool to t he wood so the heel
of the bevel makes first contact, at about the midpoint of the wing. Then rotate
the tool counterclockwise to engage the cutting edge. When this happens, pull the
tool to the left to advance the cut.
he wood so the heel
of the bevel makes first contact, at about the midpoint of the wing. Then rotate
the tool counterclockwise to engage the cutting edge. When this happens, pull the
tool to the left to advance the cut.
If you over rotate the tool and lift the bevel from the surface, the cut will simply
degenerate to a non- n the bevel comes off the surface.
*This applies to a bowl gouge with a swept back grind. A different grind might not be so forgiving.
Guiding the cuts. The wing cut can be used to create both convex and concave curves once you’ve practiced guiding the cut. In a nutshell, to deepen the cut, you roll the cutting edge toward the cut; roll the other way for less depth.
Once you get to doing tighter curves, you will have to raise the handle as you roll into a deeper cut. The reason for this is that you will be moving closer to the center line of the workpiece, and because the tool rest remains at the same height, the angle of the tool must change. Also, when the curve turns inward rather abruptly, you may need to swing the handle in the direction of the cut.
Another consideration is the effect of cutting uphill or downhill on the quality of the surface left by the cut. The rule is, basically, that you should always cut downhill. This means to cut from a larger to a smaller diameter so that the cut advances toward the center of the piece. This gives you the best chance of getting a clean cut.


The implication is that if you’ve cut fairly deep into the piece, you should not try to guide the cut back up out of the “valley” that is developing, which would be an uphill cut. It is better to stop the cut and switch to the other side where you can do a downhill cut to achieve the same thing.
Wing cut with a fingernail grind. The significant difference between a pure fingernail
grind and the swept back grind I use on a bowl gouge is that the bevel of the fingernail
does not turn in at the top of the flute. Conventional wisdom holds that this should make the fingernail very tricky to control in a wing cut—rotate the edge just a bit
far into the cut, until it comes off the bevel, and you will get a catch.
make the fingernail very tricky to control in a wing cut—rotate the edge just a bit
far into the cut, until it comes off the bevel, and you will get a catch.
However, in doing wing cuts on spindles, I do not find this to be the case. It does not tend to catch. When it comes off the bevel, it leaves a rougher surface, which is not good, but nothing else bad happens.
The reason has to do, I think, with the fact that the cutting edge makes an acute angle with the approaching wood, which results from the axis of the tool being almost at right angles to the workpiece. This, in conjunction with the curvature of the wings, viewed from the top, accounts for the stability.

The bottom line is that you can use a small detail gouge with a fingernail grind to make wing cuts on a spindle where a big, bulky bowl gouge would not be suitable.
Hollowing a Goblet
After the outside profile of the bowl of a goblet has been shaped, there comes the fun part – that of hollowing the inside. As it turns out, a 3/8” spindle gouge with a fingernail grind is ideally suited for this task. It is used in a wing cut.
Things go faster if you drill a 3/8” or 1/2” hole down the center. Do this on the lathe with the bit held by a Jacobs chuck mounted on the tailstock. You can, however, do the hollowing without drilling the hole.


In anticipation of the hollowing, here is a little detail you must take to heart. Always keep the cutting edge of the gouge in trail. Do not try to rub the bevel.
While the gouge is quite forgiving on a spindle and you can get away with almost anything, that is not the case here. The difference is in the angle the cutting edge makes to the approaching wood. With a spindle, the angle is acute, maybe 30º. Inside the goblet, it will be close to 90º. If you try to rub the bevel, you will get a catch and your goblet will simply disappear.
Begin hollowing at the edge of the hole. With the cutting edge in trail, make wing
cuts across the corner to create a cone-


It’s important to leave supporting wood in the bottom region until all cuts have been made near the rim. This is to prevent vibration and chatter, which can be annoying if nothing else. Therefore, return to the area near the rim and turn it to its final wall thickness. Then work you way down the side, taking it in steps. Keep in mind that some thickness will be lost during sanding.
For the finishing cuts, it might be helpful to lower the handle slightly so the cutting occurs a bit above center. This will give a bit of a shearing cut which usually leaves a better suface.
At some point, you will reach the bottom of the hole you drilled at the outset. This
area will need to be cleaned up, and the hollowing may need to go deeper. To deepen
the cavity, place the point of the gouge at the center and apply a small pressure
straight ahead while pulling it gently to the left. This should open a small cone-
A 1/2” round-
The thickness gauges described in the article on thickness gauges for ornaments are ideal for accurately measuring the wall thickness of the bowl of the goblet.
Next up: turning a workpiece mounted in the sidegrain orientation.